I'm headed out West, not to return for several days...however, there are fibery pursuits in my future, and I plan to have a full retrospective and photo tour of the knitting I've done, the yarn shops I've visited, and the beautiful things I've seen on the left coast just as soon as I return. Look for a post on March 9th...until then...
Happy Trails to me!
2.25.2008
2.21.2008
Someone lit a fire under my...
Whenever I start to knit a Zephyr pattern my fingers just fly. I can't explain it, but either their patterns suit me so well that I zip through them in my haste to wear them, or they are so well designed that there is almost instant gratification. It is likely a little of both.
 My most recent Zephyr knit, 28Thirty, is no exception. I began it in the midst of several other projects, mostly because I had the yarn, needles, and pattern just sitting there begging me to pick them up, but also because I'd like to get a few more sweaters in before a warm snap hits and I no longer need them. I've been very sweater focused lately.
I made a few small alterations to this project, the largest of these is knitting the sleeves flat in order to maintain a consistent gauge throughout the whole sweater. I zipped through the first sleeve while sick, and then seamed it, but wasn't happy with the result. I told myself that it would look fine once it blocked out, but it nagged at me. I started the second sleeve, clearly in denial, and then had to stop and rip out the seaming. See, I'd slipped stitches at the beginning of each row to make seaming easier, but it hadn't. At all. I thought about it for a bit and then whipped out my crochet hook and used the (in my opinion) extremely clever crocheted seaming technique I've read about here and there. It worked like a dream, and was quite stretchy to boot...it may be a new favorite! The second sleeve was completed in one night, and then seamed in another.
I decided to wait until after I'd blocked this to sew on the buttons (which you can see above in the photo), and so it took a nice room temperature bath last night and is now (slowly, I'm sure) drying in the basement. I can't wait until it's done, and plan to take it with me on my trip next week.
Wait, what? Oh yes, I'm going on a trip! I'll be in Las Vegas for a week, and then Tucson for a week. I plan to check out yarn stores in each city, so please let me know if you have any recommendations!
My most recent Zephyr knit, 28Thirty, is no exception. I began it in the midst of several other projects, mostly because I had the yarn, needles, and pattern just sitting there begging me to pick them up, but also because I'd like to get a few more sweaters in before a warm snap hits and I no longer need them. I've been very sweater focused lately.I made a few small alterations to this project, the largest of these is knitting the sleeves flat in order to maintain a consistent gauge throughout the whole sweater. I zipped through the first sleeve while sick, and then seamed it, but wasn't happy with the result. I told myself that it would look fine once it blocked out, but it nagged at me. I started the second sleeve, clearly in denial, and then had to stop and rip out the seaming. See, I'd slipped stitches at the beginning of each row to make seaming easier, but it hadn't. At all. I thought about it for a bit and then whipped out my crochet hook and used the (in my opinion) extremely clever crocheted seaming technique I've read about here and there. It worked like a dream, and was quite stretchy to boot...it may be a new favorite! The second sleeve was completed in one night, and then seamed in another.
I decided to wait until after I'd blocked this to sew on the buttons (which you can see above in the photo), and so it took a nice room temperature bath last night and is now (slowly, I'm sure) drying in the basement. I can't wait until it's done, and plan to take it with me on my trip next week.
Wait, what? Oh yes, I'm going on a trip! I'll be in Las Vegas for a week, and then Tucson for a week. I plan to check out yarn stores in each city, so please let me know if you have any recommendations!
2.19.2008
Poppy's blankie
My cousin is expecting her second child, a daughter. You may remember her oldest child, Grace, as she is the most frequent recipient of all of my knitted things. "Poppy" is due in June (and shall be born on my birthday if the stars are in alignment) which means that I have three months to complete a blanket for her. I am planning on making her the Log Cabin Moderne Baby Blanket from Mason Dixon Knitting, and couldn't be more excited. I've wanted to knit this pattern for a while, so it's perfect that I now have a child arriving that will get some use out of it.
Last night I went and bought the yarn. I'd priced out the Calmer that the pattern called for, but quite frankly, I"m not a multi-millionaire, so I went with Lion Brand Cotton Ease. I think that the colors are lovely, and I hope that Poppy appreciates them (though, she won't be able to see them for a few months!)
 From the back: violet, pink, lime green, and baby blue.
I also plan to knit her a few other things, like booties, socks, and hats. I will also be knitting "Poppy" and her big sister Grace a stuffed animal each (I can't leave out Grace while knitting all of these things!) and plan on making Elijah and Sophie from Ysolda. I hope they love everything I am knitting them!
Last night I went and bought the yarn. I'd priced out the Calmer that the pattern called for, but quite frankly, I"m not a multi-millionaire, so I went with Lion Brand Cotton Ease. I think that the colors are lovely, and I hope that Poppy appreciates them (though, she won't be able to see them for a few months!)
From the back: violet, pink, lime green, and baby blue.2.18.2008
Out of Commission
That's what I was for a solid week; Out of Commission.
On Monday I went into work, business as usual, and then noticed something was wrong when I couldn't finish my piping hot coffee and whole grain bagel (a Monday indulgence.) I left after lunch (which I hadn't eaten) and then my husband came home as well, and we went to the E.R. I had another very large (and quite painful) ovarian cyst...and was drugged up and in pain for an entire week. I am doing much better now, but I literally didn't even knit until Saturday (when I finished the body and one sleeve of 28Thirty, a repeat on the Shetland, and about four squares of Lady Eleanor.)
I knit almost nothing yesterday either since I had so much to catch up on, so I'm really looking forward to getting back into the groove this week. I'll be finishing up 28Thirty, and doing a photo shoot of that, Chocolate Stripes (aka Leftovers) and the Boatneck Bluebell that I finished months ago. So stay tuned. In the meantime, here is a photo of my adorable doggie to distract you...
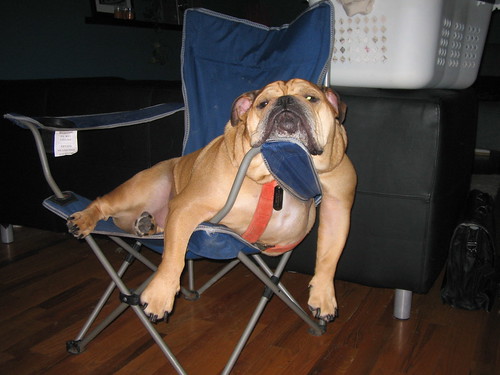 This sweet little guy didn't leave my side the entire time I was sick...and had to be literally dragged outside to go for walks. There is nothing quite like the love of an animal, though my husband is no slouch either. He was an absolute angel.
On Monday I went into work, business as usual, and then noticed something was wrong when I couldn't finish my piping hot coffee and whole grain bagel (a Monday indulgence.) I left after lunch (which I hadn't eaten) and then my husband came home as well, and we went to the E.R. I had another very large (and quite painful) ovarian cyst...and was drugged up and in pain for an entire week. I am doing much better now, but I literally didn't even knit until Saturday (when I finished the body and one sleeve of 28Thirty, a repeat on the Shetland, and about four squares of Lady Eleanor.)
I knit almost nothing yesterday either since I had so much to catch up on, so I'm really looking forward to getting back into the groove this week. I'll be finishing up 28Thirty, and doing a photo shoot of that, Chocolate Stripes (aka Leftovers) and the Boatneck Bluebell that I finished months ago. So stay tuned. In the meantime, here is a photo of my adorable doggie to distract you...
This sweet little guy didn't leave my side the entire time I was sick...and had to be literally dragged outside to go for walks. There is nothing quite like the love of an animal, though my husband is no slouch either. He was an absolute angel.
2.07.2008
Fire
Project Spectrum is upon us again, though this year, Lolly has added a new and exciting twist. This year it will be split into four categories that reflect the elements; fire, earth, air, and water. I'm always very excited about Project Spectrum, but this one should be a lot of fun. The colors are grouped accordingly:
Fire: Reds, Oranges, Pinks
Earth: Greens, Browns, Metallics
Air: Whites, Greys, and Yellows
Water: Blues, Blacks, and Purples
When I first sat down to think about fire, I naturally was drawn to what I was knitting. I mean, that's why Project Spectrum began, right? And I am knitting things that fall into this category:
 28Thirty in Jaeger Matchmaker Merino Aran in a deep brick red.
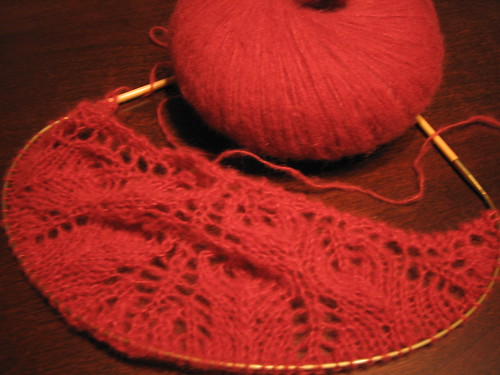 Shetland Triangle in Filatura di Crosa "Superior" in a beautiful cranberry.
 Endpaper Mitts in Dale of Norway Baby Ull in pink and green.
Fire: Reds, Oranges, Pinks
Earth: Greens, Browns, Metallics
Air: Whites, Greys, and Yellows
Water: Blues, Blacks, and Purples
When I first sat down to think about fire, I naturally was drawn to what I was knitting. I mean, that's why Project Spectrum began, right? And I am knitting things that fall into this category:
28Thirty in Jaeger Matchmaker Merino Aran in a deep brick red.Shetland Triangle in Filatura di Crosa "Superior" in a beautiful cranberry.Endpaper Mitts in Dale of Norway Baby Ull in pink and green.There are other things that involve fire besides knitting though, surely? Certainly glass blowing, smelting, and even cooking.
Cooking, though some of you don't know it, is my other true passion. I have a food blog, though I update it far less often than I update this one. It contains a few recipes, techniques, and photos. In the photo of 28Thirty above, you can see part of my cookbook collection. It is a very modest collection, compared to some, but it suits me just fine. I often just reference cookbooks, making at least three or four large alterations as I go along. Because of this, I refer to my recipes as "inspired by" the original recipe, since I rarely follow it to the number. Some of the cookbooks I'm using a lot these days are: Everyday Pasta, Cook with Jamie, Tangy, Tart, Hot, and Sweet, Molto Italiano, Nigella Express, and The Instant Cook. There are several more that I look at occasionally, and some that I almost never cook things from, but whose photos inspire me on a weekly basis. I will, in an attempt to adhere to Project Spectrum more this year, be updating my food blog with some hot and spicy recipes over the next few months...so stay tuned there as well!
Cooking, though some of you don't know it, is my other true passion. I have a food blog, though I update it far less often than I update this one. It contains a few recipes, techniques, and photos. In the photo of 28Thirty above, you can see part of my cookbook collection. It is a very modest collection, compared to some, but it suits me just fine. I often just reference cookbooks, making at least three or four large alterations as I go along. Because of this, I refer to my recipes as "inspired by" the original recipe, since I rarely follow it to the number. Some of the cookbooks I'm using a lot these days are: Everyday Pasta, Cook with Jamie, Tangy, Tart, Hot, and Sweet, Molto Italiano, Nigella Express, and The Instant Cook. There are several more that I look at occasionally, and some that I almost never cook things from, but whose photos inspire me on a weekly basis. I will, in an attempt to adhere to Project Spectrum more this year, be updating my food blog with some hot and spicy recipes over the next few months...so stay tuned there as well!
2.04.2008
Maven
May I introduce you to Maven?
 As you all know, Carrie Bradshaw (though fictional) is a fashion maven. The woman carries off looks that would be dreadful on others, and constantly inspires me to reach inside myself for something a little more creative when I get dressed each day. Be it brightly colored shoes, a fabulous waist-cinching belt, or the perfect handbag.
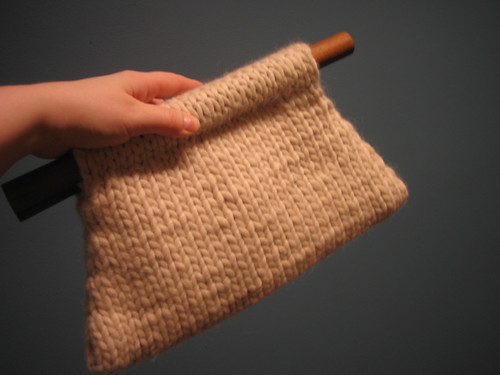
Because the new movie is coming out soon, and because my friend Jess begged and pleaded with me, I've designed a bag fit for Ms. Bradshaw (or is is Mrs. Big?) herself.
She was inspired by a bag that Carrie carried (hmmmm) in Season 4 of Sex and the City, in the episode "Change of a Dress". Apparently Jess, and avid fan of the show, has wanted it since seeing it and had recently resigned herself to the fact that she'd never get her greedy little hands on it. I took pity on poor Jess, and decided to recreate this unique clutch just for her.
In looking at the original photo:
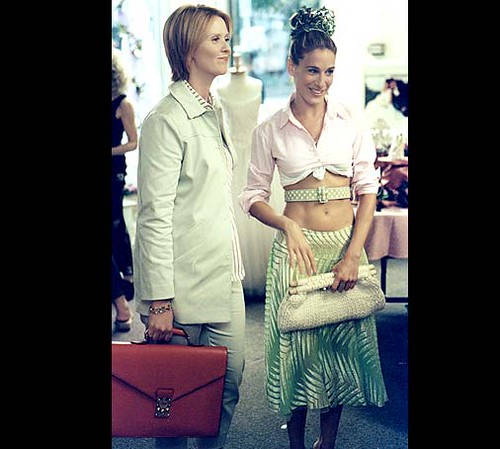 I could see that the construction would be simple...chunky yarn, big needles, minimal seaming, et voila, it's fabulous. I decided to line the bag because the yarn is so big, and sewed a doubled lining of white and blue satin. I stitched it in place with darker blue thread and it looks smashing (though slightly sloppy because I need to work on my hand-stitching skills.) Jess was in charge of procuring the dowels (3/4 inch) and she even stained them herself, they are a perfect compliment to the bag.
 The pattern is now up. It is a simple and inexpensive project to make, possible to complete in a weekend, the blocking and finishing time take more than the knitting time, which only took me about 45 minutes! As always, please let me know if you see an error in the pattern and I will happily correct it. Enjoy!
Maven
Materials:
Classic Elite Alaska - 4 balls (or other chunky yarn)
Set of #15 Straight or Circular Needles
Darning Needle and thinner yarn in a similar (if not the same) color
A small amount of fabric
Good sewing shears
Needle and thread
2 12" long dowels that are 3/4" in diameter, stained,painted, or sanded
Straight pins
Abbreviations:
CO: cast on
K: knit
P: purl
KFB: knit into the front and back of the same stitch, one stitch increased.
SSK: slip two stitches knit wise, separately, onto the right needle, then knit them together through the back of the needle, one stitch decreased.
K2Tog: knit two together, one stitch decreased.
BO: bind off
Kniting Instructions:
CO 22 stitches loosely and work in stockinette stitch until the fabric is about 1 inch long*. Begin increases using the next four rows:
Row 1: K 1, KFB, K to two stitches from the end, KFB, K 1.
Rows 2 and 4: P all stitches
Row 3: K all stitches
Repeat these four rows four times total**.
Work one row of K, and then one row of P, and then begin the decreases using the next four rows.
Row 1: K 1, SSK, K to three stitches before the end, K2Tog, K 1
Rows 2 and 4: P all stitches
Row 3: K all stitches
Repeat these four rows four times total.
Work in stockinette stitch until the fabric is about 1 inch long, then BO all stitches loosely.
Finishing Instructions:
Block the bag flat using either the steam iron method or the wet block method.
Select the fabric you would like to use for the lining, I suggest doubling up the fabric so that it will be sturdier and so that it can be a pretty color on the inside and a similar color to the yarn on the outside (so that on the off chance that you can see through your stitches, there isn't a colored fabric peeking through, you can, of course, use a contrasting color so that it peeks through the stitches, it's completely up to you!)
Lay the two pieces of fabric on top of each other and pin them together making sure to stay inside the lines of the actual bag, this will hold them together so that you only have to cut once. Leave fabric "tabs" longer than you think you'll need for the top of each side, (along where the opening of the purse will be) later on you will need to hand stitch these down and until you place the lining you won't know how long they should be.
Once dry, lay the bag on top of the fabric and trace (lightly with a pen or fabric marker) around the outside of the bag leaving about 1/4" seam allowance. Cut out the shape of the bag carefully and then pin the two pieces together about 1/2" in from the edge. Hand or machine stitch the sides of the lining together close to the pins (this will leave about 1/2 inch all the way around from the edge of the cut fabric) so that it will fit inside the bag. Trim off the excess fabric, and turn it inside out and iron the edges on the inside flat.
At this point you will need to seam the edges of your bag. Using mattress stitch, seam up the sides, leaving enough unseamed at the top so that larger items can be inserted or removed from the opening of the bag (remember that the dowels will make the opening inflexible, so leave plenty of space.)
Fold the lining in half and pin the sides together and see if it fits well inside your newly made up bag. If it doesn't, sew along the edges further in from the edge and re-trim the sides, then try to fit it again. If it does, fold it in half as if you are placing it into the bag (make sure that the lining for the interior of the bag is inside the fold) and then stitch along the sides, this will mean that there won't be any "edges" inside the bag which will look and feel nicer.
Before you stitch the "tabs" in place you will need to seam the top edges of each side of the bag in order to create the casings for the dowels. Use whatever method works for you, but be sure to seam stitch to stitch so that it's centered and even all the way across. Try your dowel out a few times so that you don't get all the way across and discover that it doesn't fit.
You are now ready to stitch in your lining! This works best with the dowels inserted, as it helps you to only go through one layer of knitting. Place the lining inside the bag and pin the top "tabs" in place. Fold them so that they are the way you'd like them to look and then remove them and iron the "tabs" down. Try to make this look as clean as possible, I folded my two pieces of fabric into one another, and then did an a row of machine sewing along the edge. This will create more stability, but it's not necessary. Once this is complete, hand stitch your lining into place, being sure to cover the seaming you've done for the dowel casing (for a cleaner look).
Now all you need to do is take your Maven out somewhere fabulous and order a Cosmopolitan!
*Adjust the length of this depending on your dowels. If you have only 1/2 inch dowels make this shorter than 1".
**At this point if you would like your bag longer, you can add another increase repeat, but be sure to add the same amount of decreases on the other side of the bag.
Copyright 2007. Pink Lady Knits
As you all know, Carrie Bradshaw (though fictional) is a fashion maven. The woman carries off looks that would be dreadful on others, and constantly inspires me to reach inside myself for something a little more creative when I get dressed each day. Be it brightly colored shoes, a fabulous waist-cinching belt, or the perfect handbag. Because the new movie is coming out soon, and because my friend Jess begged and pleaded with me, I've designed a bag fit for Ms. Bradshaw (or is is Mrs. Big?) herself.
She was inspired by a bag that Carrie carried (hmmmm) in Season 4 of Sex and the City, in the episode "Change of a Dress". Apparently Jess, and avid fan of the show, has wanted it since seeing it and had recently resigned herself to the fact that she'd never get her greedy little hands on it. I took pity on poor Jess, and decided to recreate this unique clutch just for her.
In looking at the original photo:
I could see that the construction would be simple...chunky yarn, big needles, minimal seaming, et voila, it's fabulous. I decided to line the bag because the yarn is so big, and sewed a doubled lining of white and blue satin. I stitched it in place with darker blue thread and it looks smashing (though slightly sloppy because I need to work on my hand-stitching skills.) Jess was in charge of procuring the dowels (3/4 inch) and she even stained them herself, they are a perfect compliment to the bag.The pattern is now up. It is a simple and inexpensive project to make, possible to complete in a weekend, the blocking and finishing time take more than the knitting time, which only took me about 45 minutes! As always, please let me know if you see an error in the pattern and I will happily correct it. Enjoy!Maven
Materials:
Classic Elite Alaska - 4 balls (or other chunky yarn)
Set of #15 Straight or Circular Needles
Darning Needle and thinner yarn in a similar (if not the same) color
A small amount of fabric
Good sewing shears
Needle and thread
2 12" long dowels that are 3/4" in diameter, stained,painted, or sanded
Straight pins
Abbreviations:
CO: cast on
K: knit
P: purl
KFB: knit into the front and back of the same stitch, one stitch increased.
SSK: slip two stitches knit wise, separately, onto the right needle, then knit them together through the back of the needle, one stitch decreased.
K2Tog: knit two together, one stitch decreased.
BO: bind off
Kniting Instructions:
CO 22 stitches loosely and work in stockinette stitch until the fabric is about 1 inch long*. Begin increases using the next four rows:
Row 1: K 1, KFB, K to two stitches from the end, KFB, K 1.
Rows 2 and 4: P all stitches
Row 3: K all stitches
Repeat these four rows four times total**.
Work one row of K, and then one row of P, and then begin the decreases using the next four rows.
Row 1: K 1, SSK, K to three stitches before the end, K2Tog, K 1
Rows 2 and 4: P all stitches
Row 3: K all stitches
Repeat these four rows four times total.
Work in stockinette stitch until the fabric is about 1 inch long, then BO all stitches loosely.
Finishing Instructions:
Block the bag flat using either the steam iron method or the wet block method.
Select the fabric you would like to use for the lining, I suggest doubling up the fabric so that it will be sturdier and so that it can be a pretty color on the inside and a similar color to the yarn on the outside (so that on the off chance that you can see through your stitches, there isn't a colored fabric peeking through, you can, of course, use a contrasting color so that it peeks through the stitches, it's completely up to you!)
Lay the two pieces of fabric on top of each other and pin them together making sure to stay inside the lines of the actual bag, this will hold them together so that you only have to cut once. Leave fabric "tabs" longer than you think you'll need for the top of each side, (along where the opening of the purse will be) later on you will need to hand stitch these down and until you place the lining you won't know how long they should be.
Once dry, lay the bag on top of the fabric and trace (lightly with a pen or fabric marker) around the outside of the bag leaving about 1/4" seam allowance. Cut out the shape of the bag carefully and then pin the two pieces together about 1/2" in from the edge. Hand or machine stitch the sides of the lining together close to the pins (this will leave about 1/2 inch all the way around from the edge of the cut fabric) so that it will fit inside the bag. Trim off the excess fabric, and turn it inside out and iron the edges on the inside flat.
At this point you will need to seam the edges of your bag. Using mattress stitch, seam up the sides, leaving enough unseamed at the top so that larger items can be inserted or removed from the opening of the bag (remember that the dowels will make the opening inflexible, so leave plenty of space.)
Fold the lining in half and pin the sides together and see if it fits well inside your newly made up bag. If it doesn't, sew along the edges further in from the edge and re-trim the sides, then try to fit it again. If it does, fold it in half as if you are placing it into the bag (make sure that the lining for the interior of the bag is inside the fold) and then stitch along the sides, this will mean that there won't be any "edges" inside the bag which will look and feel nicer.
Before you stitch the "tabs" in place you will need to seam the top edges of each side of the bag in order to create the casings for the dowels. Use whatever method works for you, but be sure to seam stitch to stitch so that it's centered and even all the way across. Try your dowel out a few times so that you don't get all the way across and discover that it doesn't fit.
You are now ready to stitch in your lining! This works best with the dowels inserted, as it helps you to only go through one layer of knitting. Place the lining inside the bag and pin the top "tabs" in place. Fold them so that they are the way you'd like them to look and then remove them and iron the "tabs" down. Try to make this look as clean as possible, I folded my two pieces of fabric into one another, and then did an a row of machine sewing along the edge. This will create more stability, but it's not necessary. Once this is complete, hand stitch your lining into place, being sure to cover the seaming you've done for the dowel casing (for a cleaner look).
Now all you need to do is take your Maven out somewhere fabulous and order a Cosmopolitan!
*Adjust the length of this depending on your dowels. If you have only 1/2 inch dowels make this shorter than 1".
**At this point if you would like your bag longer, you can add another increase repeat, but be sure to add the same amount of decreases on the other side of the bag.
Copyright 2007. Pink Lady Knits
Subscribe to:
Posts (Atom)