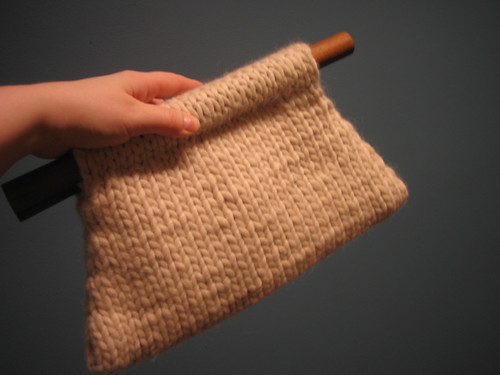
 As you all know, Carrie Bradshaw (though fictional) is a fashion maven. The woman carries off looks that would be dreadful on others, and constantly inspires me to reach inside myself for something a little more creative when I get dressed each day. Be it brightly colored shoes, a fabulous waist-cinching belt, or the perfect handbag.
 Because the new movie is coming out soon, and because my friend Jess begged and pleaded with me, I've designed a bag fit for Ms. Bradshaw (or is is Mrs. Big?) herself.
She was inspired by a bag that Carrie carried (hmmmm) in Season 4 of Sex and the City, in the episode "Change of a Dress". Apparently Jess, and avid fan of the show, has wanted it since seeing it and had recently resigned herself to the fact that she'd never get her greedy little hands on it. I took pity on poor Jess, and decided to recreate this unique clutch just for her.
In looking at the original photo:
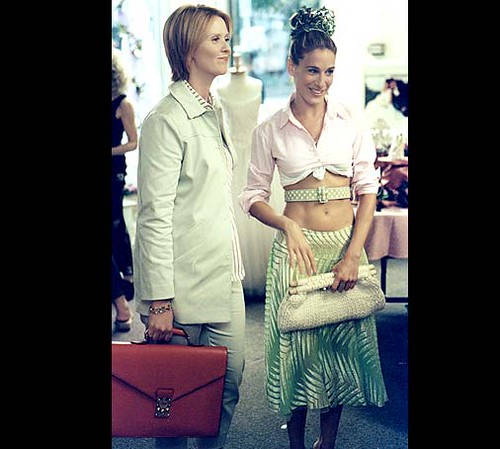 I could see that the construction would be simple...chunky yarn, big needles, minimal seaming, et voila, it's fabulous. I decided to line the bag because the yarn is so big, and sewed a doubled lining of white and blue satin. I stitched it in place with darker blue thread and it looks smashing (though slightly sloppy because I need to work on my hand-stitching skills.) Jess was in charge of procuring the dowels (3/4 inch) and she even stained them herself, they are a perfect compliment to the bag.
 The pattern is now up. It is a simple and inexpensive project to make, possible to complete in a weekend, the blocking and finishing time take more than the knitting time, which only took me about 45 minutes! As always, please let me know if you see an error in the pattern and I will happily correct it. Enjoy!
Maven
Materials:
Classic Elite Alaska - 4 balls (or other chunky yarn)
Set of #15 Straight or Circular Needles
Darning Needle and thinner yarn in a similar (if not the same) color
A small amount of fabric
Good sewing shears
Needle and thread
2 12" long dowels that are 3/4" in diameter, stained,painted, or sanded
Straight pins
Abbreviations:
CO: cast on
K: knit
P: purl
KFB: knit into the front and back of the same stitch, one stitch increased.
SSK: slip two stitches knit wise, separately, onto the right needle, then knit them together through the back of the needle, one stitch decreased.
K2Tog: knit two together, one stitch decreased.
BO: bind off
Kniting Instructions:
CO 22 stitches loosely and work in stockinette stitch until the fabric is about 1 inch long*. Begin increases using the next four rows:
Row 1: K 1, KFB, K to two stitches from the end, KFB, K 1.
Rows 2 and 4: P all stitches
Row 3: K all stitches
Repeat these four rows four times total**.
Work one row of K, and then one row of P, and then begin the decreases using the next four rows.
Row 1: K 1, SSK, K to three stitches before the end, K2Tog, K 1
Rows 2 and 4: P all stitches
Row 3: K all stitches
Repeat these four rows four times total.
Work in stockinette stitch until the fabric is about 1 inch long, then BO all stitches loosely.
Finishing Instructions:
Block the bag flat using either the steam iron method or the wet block method.
Select the fabric you would like to use for the lining, I suggest doubling up the fabric so that it will be sturdier and so that it can be a pretty color on the inside and a similar color to the yarn on the outside (so that on the off chance that you can see through your stitches, there isn't a colored fabric peeking through, you can, of course, use a contrasting color so that it peeks through the stitches, it's completely up to you!)
Lay the two pieces of fabric on top of each other and pin them together making sure to stay inside the lines of the actual bag, this will hold them together so that you only have to cut once. Leave fabric "tabs" longer than you think you'll need for the top of each side, (along where the opening of the purse will be) later on you will need to hand stitch these down and until you place the lining you won't know how long they should be.
Once dry, lay the bag on top of the fabric and trace (lightly with a pen or fabric marker) around the outside of the bag leaving about 1/4" seam allowance. Cut out the shape of the bag carefully and then pin the two pieces together about 1/2" in from the edge. Hand or machine stitch the sides of the lining together close to the pins (this will leave about 1/2 inch all the way around from the edge of the cut fabric) so that it will fit inside the bag. Trim off the excess fabric, and turn it inside out and iron the edges on the inside flat.
At this point you will need to seam the edges of your bag. Using mattress stitch, seam up the sides, leaving enough unseamed at the top so that larger items can be inserted or removed from the opening of the bag (remember that the dowels will make the opening inflexible, so leave plenty of space.)
Fold the lining in half and pin the sides together and see if it fits well inside your newly made up bag. If it doesn't, sew along the edges further in from the edge and re-trim the sides, then try to fit it again. If it does, fold it in half as if you are placing it into the bag (make sure that the lining for the interior of the bag is inside the fold) and then stitch along the sides, this will mean that there won't be any "edges" inside the bag which will look and feel nicer.
Before you stitch the "tabs" in place you will need to seam the top edges of each side of the bag in order to create the casings for the dowels. Use whatever method works for you, but be sure to seam stitch to stitch so that it's centered and even all the way across. Try your dowel out a few times so that you don't get all the way across and discover that it doesn't fit.
You are now ready to stitch in your lining! This works best with the dowels inserted, as it helps you to only go through one layer of knitting. Place the lining inside the bag and pin the top "tabs" in place. Fold them so that they are the way you'd like them to look and then remove them and iron the "tabs" down. Try to make this look as clean as possible, I folded my two pieces of fabric into one another, and then did an a row of machine sewing along the edge. This will create more stability, but it's not necessary. Once this is complete, hand stitch your lining into place, being sure to cover the seaming you've done for the dowel casing (for a cleaner look).
Now all you need to do is take your Maven out somewhere fabulous and order a Cosmopolitan!
*Adjust the length of this depending on your dowels. If you have only 1/2 inch dowels make this shorter than 1".
**At this point if you would like your bag longer, you can add another increase repeat, but be sure to add the same amount of decreases on the other side of the bag.
Copyright 2007. Pink Lady Knits